DIY Raspberry Pi Weather Station Circuit Diagram Our Raspberry Pi weather station should get an additional feature: In addition to the currently measured data, we also want to make predictions for the next day. To do this, we edit the previously created Things file and add the following lines (forecast = 1 indicates that the values are retrieved for the next day, 2 for the day after next This Weather Station tutorial is part of a joint project developed with my friend Mauricio Pinto. Here, we learned how to capture several important data, related to weather, as Air Temperature and Humidity, Pressure and UV. Another very important data to be added to a Weather Station are Wind Speed and Direction.

Transform your Raspberry Pi into a powerful environmental monitoring station with precision sensors that track temperature, humidity, air quality, and atmospheric pressure in real-time. Whether you're monitoring your home environment, conducting scientific research, or building an automated greenhouse system, this comprehensive guide will walk you through creating a professional-grade sensor Variety of weather sensors and Raspberry Pi components arranged on a table Hardware Components. To build your Raspberry Pi weather station, you'll need a Raspberry Pi board (3B+ or 4 recommended), a BME280 temperature, humidity, and pressure sensor, a rain gauge, an anemometer for wind speed, and an optional wind vane for direction. Before diving into the assembly and coding, it's crucial to understand the key components involved in building your weather station. Hardware Essentials. A robust Raspberry Pi weather station typically includes: Raspberry Pi Board: Any model works, but newer models like the Raspberry Pi 4 offer improved processing capabilities.
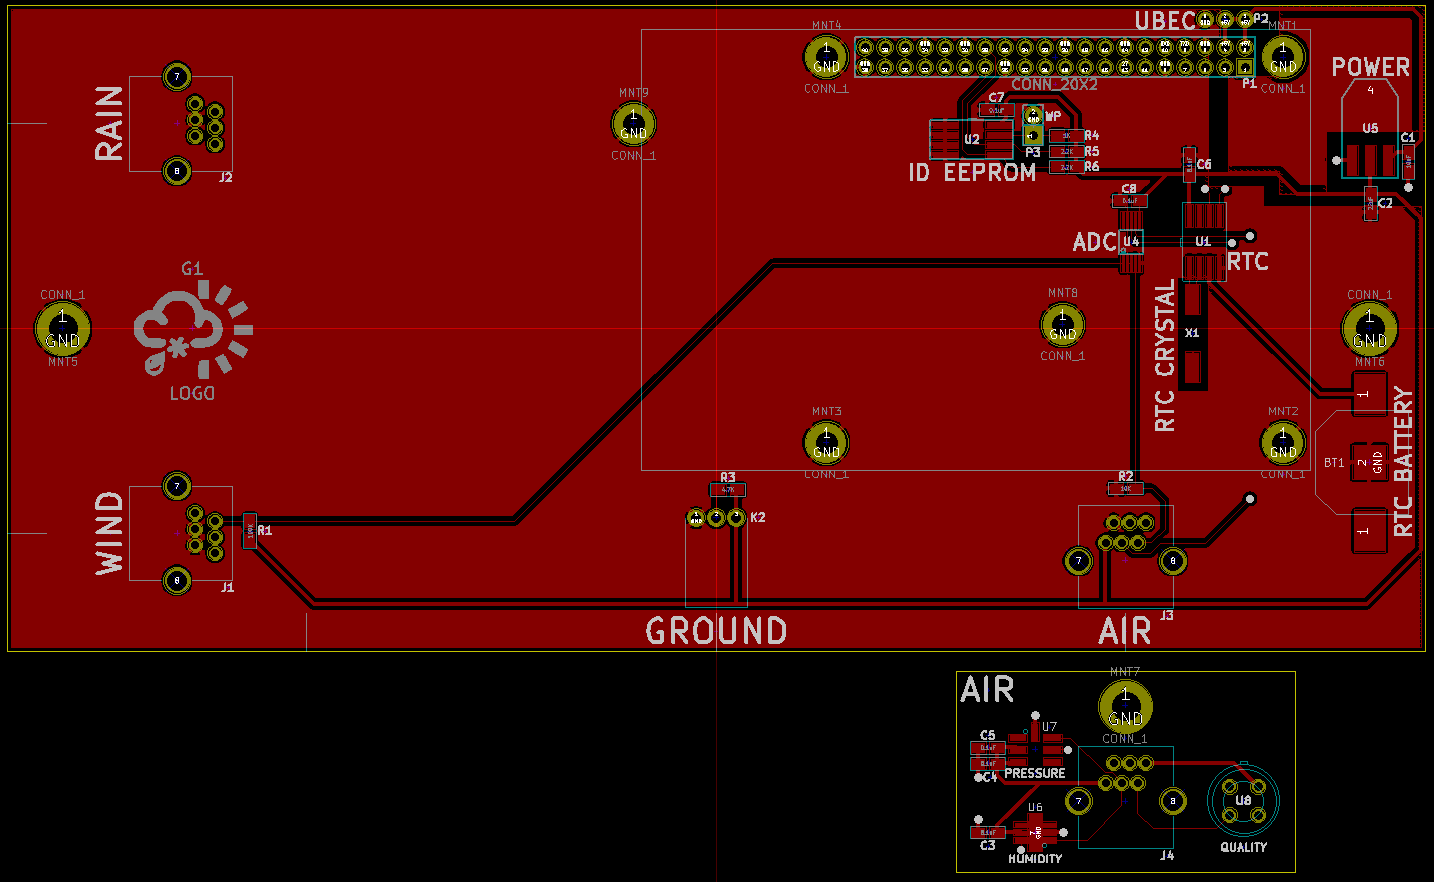
How to Build a Weather Station With a Raspberry Pi Circuit Diagram
For the next steps, please follow our next tutorial on how to build an IOT-based weather station. Conclusion. In this post, we learned the basics of using a Raspberry Pi as the basis for an Internet of Things-based weather station. Learn how to build a personal weather station using Raspberry Pi 5 to monitor temperature, humidity, and atmospheric pressure in real-time. This guide covers essential components, sensor setup, coding, and data visualization. Perfect for DIY enthusiasts, this project offers valuable insights into weather patterns while enhancing your skills in electronics and programming. Personal Weather Station The Raspberry Pi is a powerful, full-fledged computer that opens up endless possibilities for creativity and learning. Whether you're a beginner or an experienced maker who loves to tinker with electronics and programming, this guide will help you get started building a weather station with a Raspberry Pi.. To build a weather station with a Raspberry Pi, start by selecting essential
Building a Raspberry Pi weather station is a rewarding project that combines creativity, programming, and engineering. With the ability to monitor temperature, humidity, and pressure in real-time, this DIY solution is perfect for hobbyists, students, and even weather enthusiasts.