PDF An Automated Greenhouse Monitoring and Controlling System using Circuit Diagram It consists of several files that work together to create a smart greenhouse controlled by a Raspberry Pi. Make sure to follow the instructions in the Configuration and produ;ction file on the GitHub repository to set up the project correctly, including installing the necessary dependencies and configuring the environment. Here we are suggesting an IoT Based System which will help in the maintenance of Greenhouse with its plantations, the aim is to develop a novel system using electronic sensor networks, concepts of Hoque et al. [19] propose a system for monitoring and controlling a greenhouse that collects environmental parameters such as temperature, humidity, light, and soil moisture using a variety of

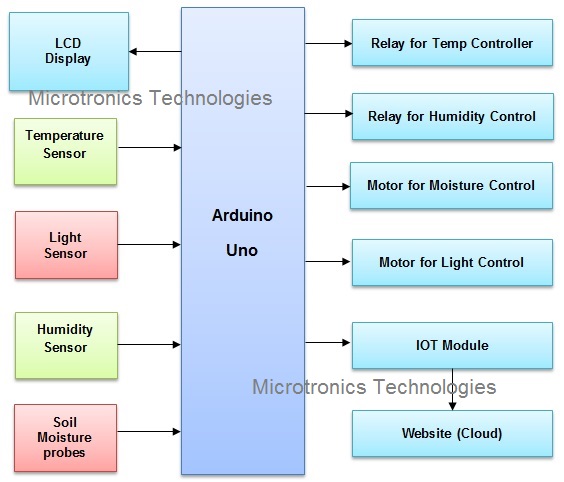
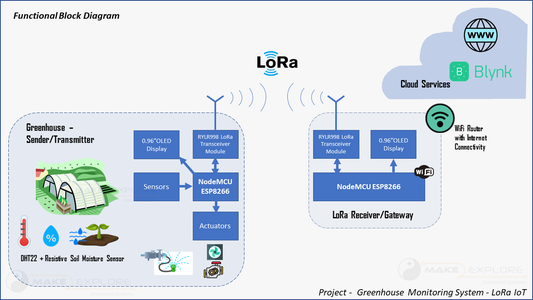
With your automated greenhouse system up and running, it's time to start monitoring and managing it. This involves accessing the data remotely, using charts for data visualization, and troubleshooting any issues that arise. Accessing Data Remotely. One of the key benefits of an automated greenhouse is the ability to monitor it remotely. Wi-Fi Connectivity & Graphical Dashboard is made possible between Arduino and Blynk App. The smart greenhouse automated system consist a few different sensors, each sensor has different ports. These different ports are then coded and connected with the Blynk app which allows the user to monitor the plant remotely through Wi-Fi connectivity.
DIY Automated Greenhouse Monitoring With Raspberry Pi Grow Room ... Circuit Diagram
Effective monitoring and control systems are the backbone of any smart greenhouse. These systems collect data from various sensors and use it to make real-time adjustments, ensuring optimal growing conditions. Automated greenhouses lower water and energy usage by ensuring resources are used only when necessary. For example, soil moisture Arduino systems can grow with your greenhouse, making them a smart long-term investment. Now, let's get down to the nitty-gritty and start building your automated greenhouse system. Building Blocks of an Arduino Automated Greenhouse Choosing the Right Arduino Board. First things first, you'll need an Arduino board.
Here are some of the sensors commonly used for smart greenhouse monitoring system: Carbon dioxide sensors. These devices monitor the concentration of CO 2 in the air. High levels of CO 2 can negatively affect plant growth, so it is critical to observe and regulate CO 2 levels in the greenhouse. Soil moisture sensors monitor the moisture level DIY Smart Irrigation System Using Arduino - Learn how to automate plant watering with sensors and Arduino, a great complement to your greenhouse project. IoT-Based Weather Monitoring System - Explore another practical IoT project that collects real-time weather data, which can be integrated into automated farming solutions. An automated greenhouse control system leverages technology to optimize plant growth conditions. By integrating sensors such as soil moisture, pH, light intensity, temperature, and humidity sensors with a microcontroller like the ESP32, the system can monitor and adjust environmental factors in real-time. This automation ensures optimal plant health, reduces manual labor, and maximizes yield
