Step by step instructions SriTu Circuit Diagram In this tutorial you will learn how to use a buzzer (or piezo speaker) with Arduino. Buzzers can be found in alarm devices, computers, timers and confirmation of user input such as a mouse click or keystroke. The loop() routine will make this run again and again making a short beeping sound. (you can also use tone(pin, frequency, duration Hello guys,This tutorial includes how to make a buzzer sound in Arduino. Also, this "buzzer sound in Arduino" tutorial described step by step.OK enjoy it now By interfacing a buzzer with Arduino, you can create sound effects, alarms, melodies, and more. In this blog post, we will guide you through the process of connecting and programming a buzzer with Arduino. People also refer to a Buzzer as a Piezo Buzzer. The Arduino can produce sound through an output device like a speaker or Piezo.

In this tutorial, we'll learn how to use the Arduino With Active Buzzer & Passive Buzzer in your projects. You'll also learn how to use the tone and noTone functions to create a couple of Arduino Buzzer Code Example projects.. We'll start off by explaining the differences between Active Buzzers vs Passive Buzzers.Then, we'll discuss how to interface each of them with Arduino with a
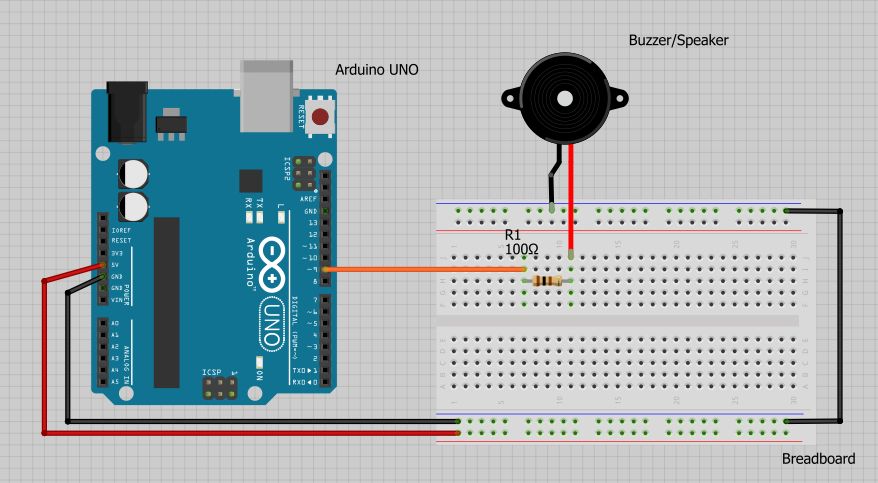
How to make buzzer sound in Arduino Circuit Diagram
Pairing an Arduino and a piezo buzzer is easy. The buzzer is equipped with two pins: one for signal control and another for ground. In the setup below, the tone control will be managed by Arduino's D9 pin. Importing pitches library. The code used to generate the melody uses an extra library available on our GitHub. This file contains all the Popular songs and melodies generated with a buzzer. HiBit - Buzzer. Official HiBit repository for buzzer: wiring, schema and Arduino code (including libraries).

How to Use a Buzzer (or Piezo Speaker) - Arduino Tutorial: In this tutorial you will learn how to use a buzzer or piezo speaker with Arduino. Buzzers can be found in alarm devices, computers, timers and confirmation of user input such as a mouse click or keystroke. stops the signal sound. The loop() routine will make this run again and An active buzzer has a built-in oscillating source, so it will make sounds when electrified. But a passive buzzer does not have such source, so it will not tweet if DC signals are used; instead, you need to use square waves whose frequency is between 2K and 5K to drive it. The active buzzer is often more expensive than the passive one because

Playing popular songs with Arduino and a buzzer Circuit Diagram
Place the piezo buzzer into the breadboard, so that the two leads are on two separate rows. Using jumper wires, connect the positive lead to Arduino digital pin 8. The case of the buzzer may have a positive sign (+) on it to indicate the positive lead (if not, then the red wire usually indicates the positive lead).